
In my article about the best services for removing background of image online I introduced you to some fantastic sites that I’m sure you won’t forget so easily… and I should hope so, since they’re wonderful time savers! There is one though that rises above all the others, and that’s why I chose to write an article entirely dedicated to it. Come and meet Clipping Magic, discover its features and get ready to fall in love with it instantly!
I’m always looking for the best services to offer to my readers, and those for removing background of image online are no different. There are so many around, but as always in my articles I try to collect only the best ones.
Of course nothing is perfect in this world, but if there’s one that comes close to being it, it’s Clipping Magic. I assure you that I’ve tried lots of online tools to remove the background from a photo, but none can match the completeness of functions and efficiency of this extraordinary tool.
But what makes Clipping Magic so different? Why should you choose it over so many others? Let’s find out together!
Try Clipping Magic out for free!
Zooming e panning
Clipping Magic immediately begins to be recognized for the extraordinary fluidity of zooming and panning.
Upload a photo now and you will notice it too! Just click on the appropriate button or drag and drop. You can also paste an image or URL.

Working quickly and smoothly is essential when you don’t have time to waste, and Clipping Magic seems to understand this perfectly.
You won’t need to switch between tools as you work, so you can brush and explore different areas of the image seamlessly. With such immediate zooming and equally fluid panning, everything becomes extremely natural and responsive.
How to remove background of image online with Clipping Magic
Removing the background from a photo is super easy. Once loaded, the artificial intelligence will work for you, providing you with a first result.

Intelligent is the automatic detection of the image type.
In fact, different images require different algorithms to best remove the background, and Clipping Magic offers us three processing modes:
- Photo: is the default mode and is good for photographs of real-world subjects.
- Graphics: suitable for logos and computer-generated graphics.
- Scan: for scans and photographs of written or printed materials.
The processing mode is selected automatically, but you’re free to change it at any time using the specific widget in the right sidebar.

The green brush for restoring and the red one for deleting
If you’re not satisfied, you can use the green brush and the red brush to restore and erase respectively. Then use the green brush on the areas of the image you want to restore and the red one on the points to remove.
Did you do something wrong? Don’t worry, just click the Undo button to go back and undo your changes.
You can also use the Eraser tool to erase brush strokes at any time.

You don’t need to to go overboard with the strokes, in fact, the site recommends going slow for best results.


The great thing is that the changes are visible in almost real time! I’ve often used editors that made me wait whole seconds with every brushstroke… really unnerving. Luckily with Clipping Magic this problem does not exist!
Define the cutout (offset, smoothing and feathering) with Clipping Magic
Clipping Magic is not limited to clipping, it also offers us various options for defining it. In fact, you can choose its intensity (Offset), make it more or less soft (Smoothing) and decide whether or not to apply a fading (Feathering).

There’s also the automatic detection of corners (Corners) in order to generate sharper results. The option is already active by default, but of course you can disable it whenever you want.

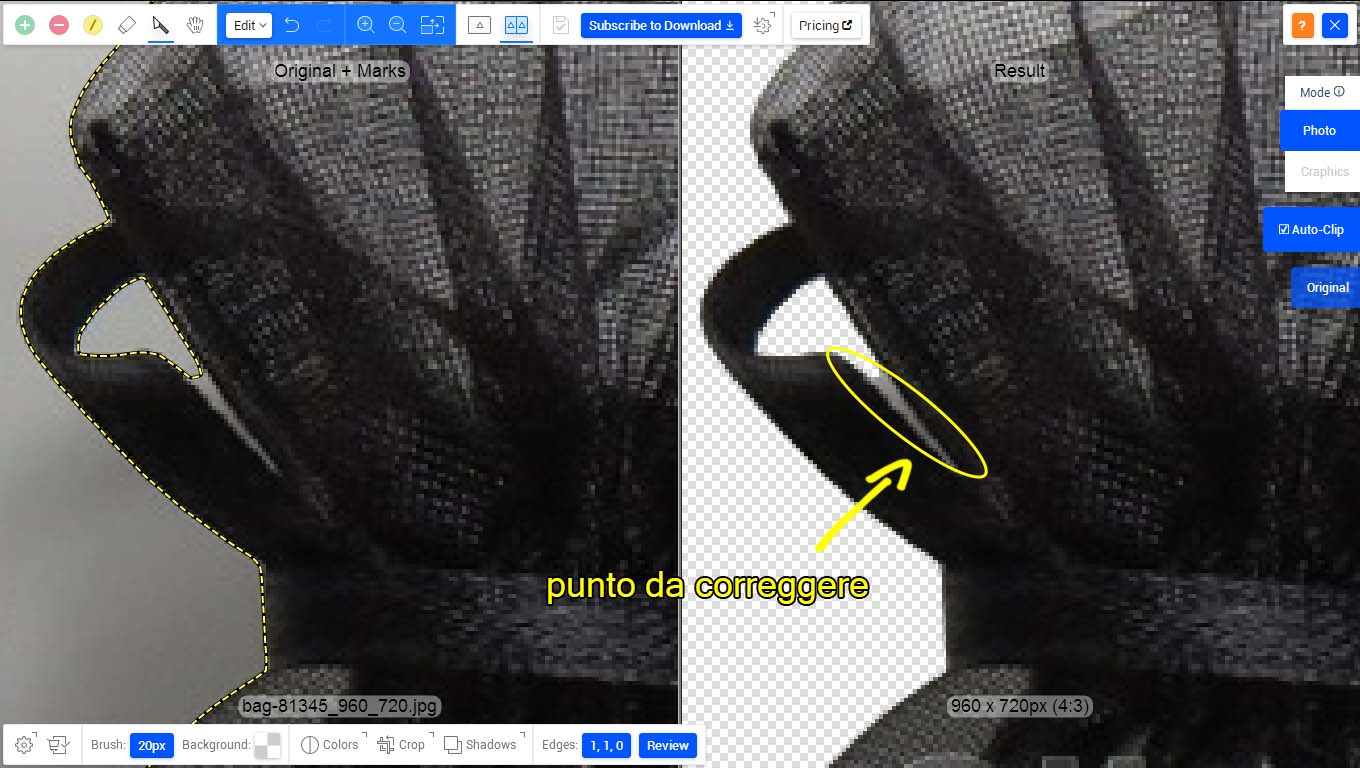
The Scalpel tool for the toughest zones
Sometimes it’s impossible to get precise results using only the brush. In fact, certain areas require the intervention of more precise tools, and this is why Clipping Magic makes the scalpel available.
This tool is very reminiscent of Photoshop pen, and will help you get perfect cutouts in a few simple steps.
To generate a path, just click and drag. You will then see a line with two dots at either end.
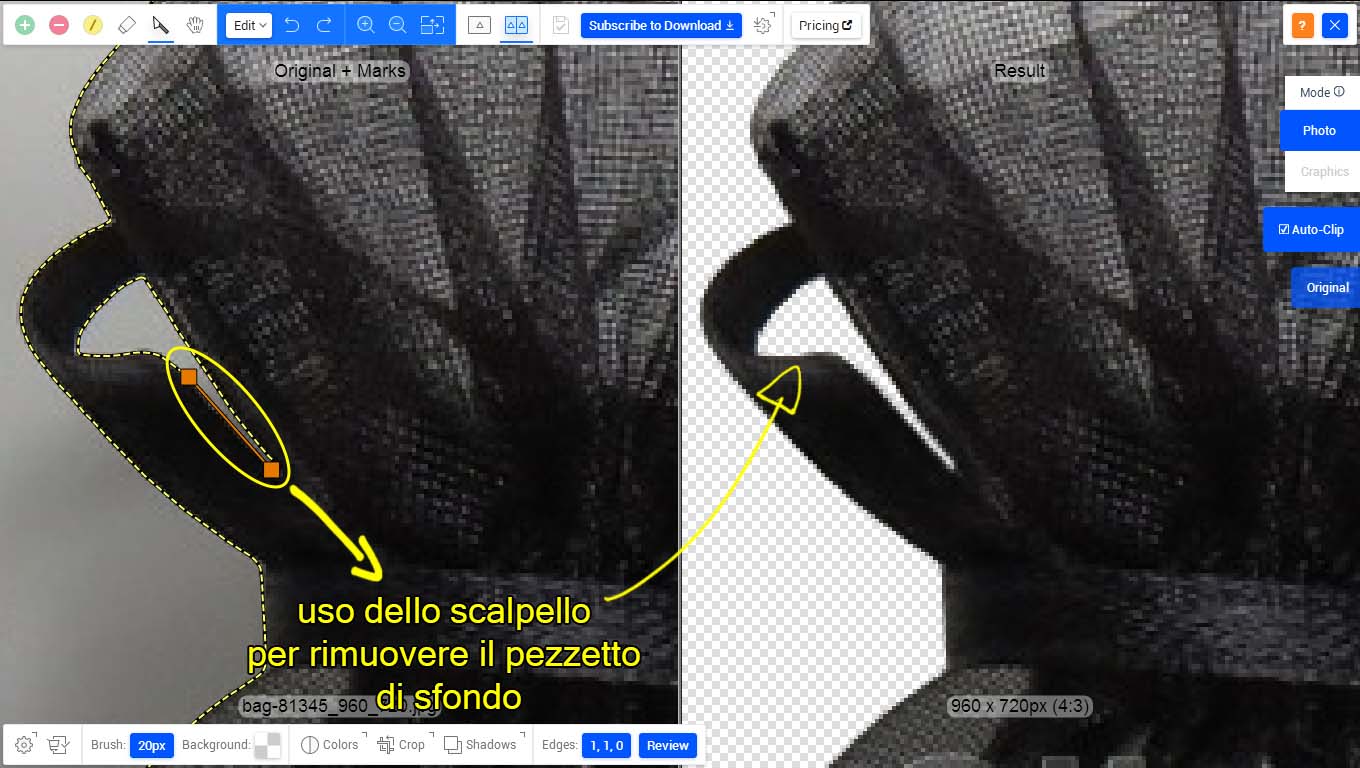
To add a point to the path, click on it where you want it to appear.
To add a segment to the path, place the cursor near the point you want to continue from and, as before, drag and drop.

You can generate both straight and curved segments. Just change the type of point (corner or smooth) by clicking on the appropriate symbol.
The square indicates a corner point, the circle a smooth point.


Of course, you’re free to delete points at any time by clicking on the X symbol.
The Hair tool to cut out hair
Hair and fur are among the elements that drive us crazy when it comes to removing the background from a photo. Fortunately, Clipping Magic provides us with the Hair tool, and the best part is that using it is as easy as drinking a glass of water.
Sure it’s true, nowadays there are many services that offer it, but how effective and easy is it to use? For example, I remember FocoClipping, where the process was far too cumbersome and unpleasant.
Here, however, all you have to do is brush with the Hair tool on the edge and you’re done! The result is surprising.


The automatic scaling of the brush when used on hair is excellent. In fact, the size will become one pixel, allowing us to restore or remove the points of the image with extreme precision.


Preserve shadows with the Hair tool
But the Hair tool also hides a very interesting function that deserves to be mentioned.
Have you ever had to cut out a subject and wanted to preserve the shadows? Well, thanks to this fantastic tool you’ll be able to do it without problems and with extreme ease.
All you have to do is brush on the shadow in question… so easy!


Retouch and enrich the cutout (light, color, shadows, etc.) with Clipping Magic
As for the finishing touches, Clipping Magic is definitely a cut above many of its competitors.
Let’s see together what you can do to make your clipping even more complete and captivating:
- Change the background color
- Retouch light and color (brightness, shadows, lights, temperature and saturation)
- Set the white balance
- Remove a color cast
- Crop and resize the image
- Rotate the image
- Apply shadows and reflections
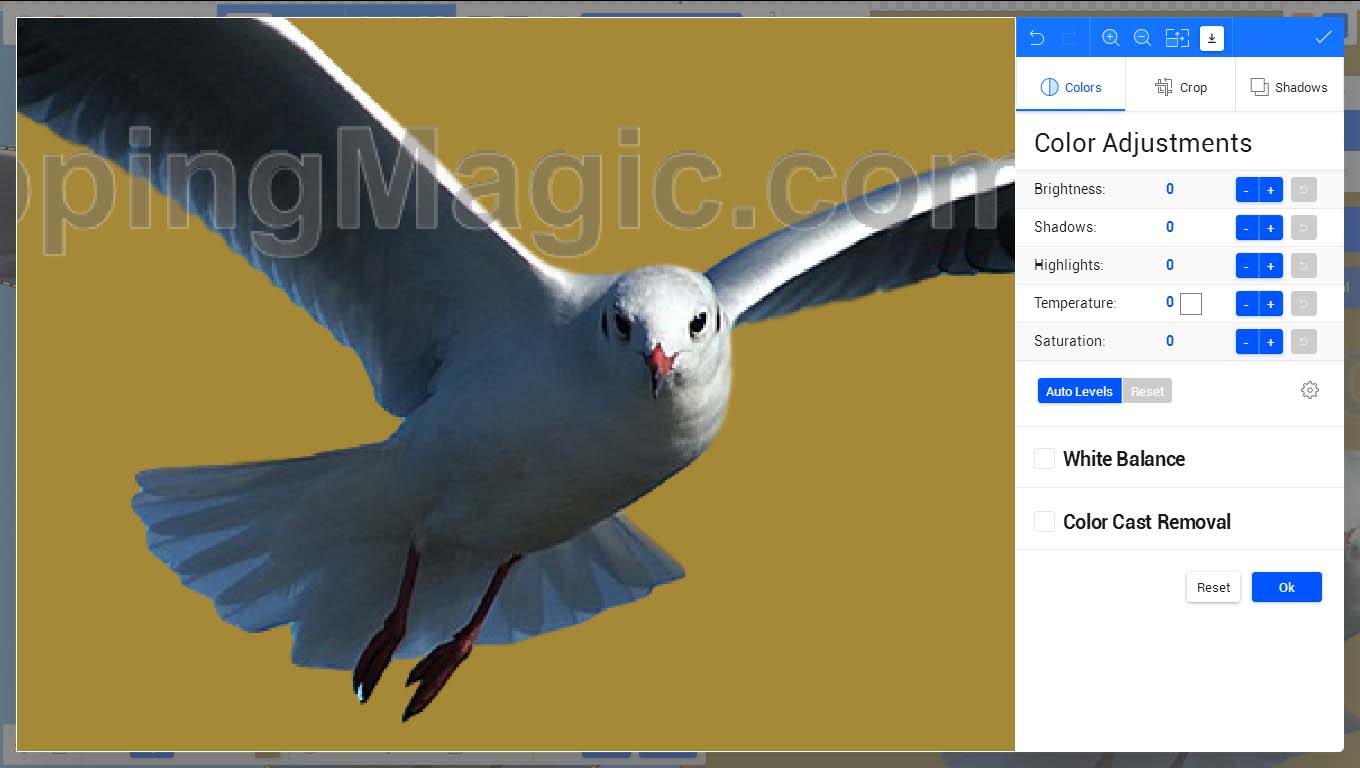


Among other things, the possibility of undoing any changes with the Reset button is fantastic. In this way, even if we mess up, we can go back at any time.
Try Clipping Magic out for free!
Save the recurrent settings
The many possibilities to refine and enrich the final result are not the only factor that makes Clipping Magic stand out.
A great convenience is represented by the saving of recurring settings, especially useful when there are a lot of images to be processed.
The settings panel is full of options and you can set almost anything. Any examples? Brush size, background color, image size, file format, and more.


This way you won’t have to worry about changing an option every time you cut out an image, because your choice will be remembered by the editor. An excellent time saver, don’t you think too?
Cut out more images at once
Could bulk clipping ever miss in such a professional service? Of course not!
Naturally this is a fundamental option for those who need to process large quantities of photographs, such as an e-commerce manager for example.


Clipping Magic bulk clipping is fantastic:
- There are no limits on the number of images to be processed.
- The next image is preloaded in the background so that it’s ready for editing as soon as the work on the current image is done.
- You can also decide to clip a photo later by clicking on the Skip button and going directly to the next image.
- If your photos share nearly identical subjects and camera settings, the Copy-Paste Marks feature will help you a lot. You can basically copy strokes applied to one image and paste them onto the next, undoubtedly saving a lot of time.
- You can download the images individually or all at once via ZIP file.
- At the end of the bulk clipping you’ll be able to manage all the processed images. You’re free to re-clip and re-download the ones you’ve already worked on, but also to process the photos you haven’t clipped or downloaded.
Take a look at the video below to see how it works.
Export the clipping path as SVG or TIFF
Among many great options, Clipping Magic allows you to export the clipping path in SVG and TIFF format.
The former is a great way to extract shapes from photos, while the latter makes it easy to do further editing in Photoshop.
Clipping Magic plans and prices
It would be nice if all this good things were free, right?
Well, let me tell you that Clipping Magic’s prices are very modest compared to the competitors. In fact, I’m always surprised at how cheap such a complete and professional service can be.
The system works through credits, and calculating the ones you will need is very simple.
1 credit = 1 image
A credit is therefore needed to cut out a photo. Easy, isn’t it?
Here are the most popular plans and their prices:
- Light: 15 credits per month for $3.74
- Standard: 100 credits per month for $7.49
- Pro: 500 credits per month for $17.99
I also want to remind you that Clipping Magic provides custom API solutions. If you have an e-commerce for example, integrating the editor into your site would be perfect for optimizing your workflow.
Try Clipping Magic out for free!
Conclusions
In this article you could understand why I consider Clipping Magic one of the best services for removing background of image online.
Its phenomenal algorithm, the wealth of features and above all the extremely low costs, make it a really hard tool to beat.
Before concluding, let’s review the pros and cons!
Pro
- Phenomenal AI
- Automated cutout
- Magic brushes for retouching the result
- Zooming and panning extraordinarily fluid
- Real time edits
- 3 processing modes: photo, graphics, scan
- Hair and Scalpel tools to handle hair and toughest zones of the image
- Possibility to define the cutout (offset, smoothing, feathering)
- Copy-Paste Marks function to spare time in case of almost identical subjects and camera settings
- Lots of options for retouching and enriching the cutout (light, color, shadows etc.)
- Exporting the clipping path as SVG or TIFF
- Saving of recurring options
- Bulk clipping
- Custom API solutions
- Very low prices
Cons
- None
There’s nothing to lose by trying, right? So why not put it to the test now? You can upload as many images as you like, test the service, and download the results in a smaller size for non-commercial use.
And you? Do you already use Clipping Magic and would like to share your experience? Do it with a comment! Greetings, see you next time!